- Check the Top 5 Obstacles below to see if it can be resolved
- Check the FAQ for further standard troubleshooting
- If not resolved, fill in the support form below. Ensure you add the Digital Passport, Order ID, and detailed account of the problem and what you have tried to resolve it, for faster resolution of the issue
- We will investigate and contact you with potential resolutions. If it requires DoorBird Tech Support in Germany to do some server side testing or software reinstallation, we will raise a support ticket on your behalf and assist DoorBird in resolving the problem as quick as possible
- If the problem lies with a dependent system as noted above, once that is diagnosed we will do whatever we can to assist, but obviously there is only so much we can do when it relates to your network, environment, or cabling system
- If the problem is diagnosed to be a defective DoorBird unit, Doorbird will issue an RMA and send an advanced replacement, which we will forward to you. Depending on which model you have, this is typically the electronics unit behind the fascia that is replaced. DoorBird typically do not replace the fascia or backbox

Technology is wonderful. It makes our lives safer and easier… until it doesn’t.
Electronics these days are not perfect, and sometimes break down. They are also so much more co-dependent than they have ever been. For example, to work flawlessly, a DoorBird depends on a solid and working LAN/WiFi data network, a fast and reliable internet service, correct power and wiring, and an up-to-date smartphone with the app correctly installed. Therefore solving any issues with a Doorbird sometimes requires diagnostics of not just the DoorBird, but all of the dependencies listed above.
If you are experiencing an issue with your DoorBird or trouble with the initial setup, first of all we apologise for any inconvenience. As DoorBird is both an ‘online’ and 'professional install' business model, there are certain steps to take for the fastest and most efficient resolution of the problem.
If you purchased from this site (DoorBird Intercom website in Australia)
If you purchased through an Installer
- Check the Top 5 Obstacles below to see if it can be resolved
- Check the FAQ for further standard troubleshooting
- If not resolved, contact the installer so they can investigate the DoorBird and its dependencies together
- If the installer purchased through our trade channel, they will contact us to assist with the resolution, and to process the RMA if required.
- If the installer purchased directly or through another reseller, they can organise support from DoorBird via a support ticket, or you can do it directly on hello@doorbird.com or https://doorbird.com/en/contact
If you purchased directly from Doorbird in Germany, or from another reseller
- Check the Top 5 Obstacles below to see if it can be resolved
- Check the FAQ for further standard troubleshooting
- Contact the reseller for support
- If need be, you can contact Doorbird directly on hello@doorbird.com or https://doorbird.com/en/contact
Top 5 Obstacles
Lost Digital Passport
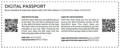
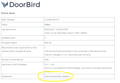
The Digital Passport is the A4 piece of paper that comes in the box with your DoorBird inside the sleeve with the instruction manual. This is absolutely key to the security of your device. DoorBird do not have access to your unit, as the cyber security is all generated in to this Digital Passport.
example Digital Passport
The Digital Passport allows you to;
- Add a new smartphone as a client for your DoorBird
- Add access to the Administration settings to your app
- Change/update smartphones that are paired with your DoorBird
- Provide access to the DoorBird tech support team to assist remotely with diagnosing and rectifying issues.
In the event you misplace your original Digital Passport, there are a couple of ways of replacing it and restoring access.
Solution 1 - If you can still access the Administration settings on at least one Smartphone
If you still have at least 1 smartphone or tablet that can access the Administration settings of the DoorBird via saved credentials, please follow the steps below

Instruction Steps
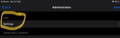
1. Select the Settings icon in the bottom right of the screen

2. Enter the Administration settings in the section labelled ‘Further Functionality’
3. Select ‘Continue’ with your saved Administration credentials
4. App will take 5 - 30 seconds to enter the Administration setting
5. In the ‘User’ section at the top, select ‘Settings’
6. Select the user ending in *0001
7. Select ‘Share User Data’

8. Now selecting the most appropriate app that is installed on your smartphone, you can send the user QR code to another device or person.
9. When adding a new device you can scan this QR code to pair to the DoorBird
You can also use the steps above but select the Administration user *0000, to save the Admin QR code for future reference
This QR code is now your Digital Passport (user login), so please save for future use.
Solution 2 - If you don’t have access to the Administration settings on at least one Smartphone
If you cannot access the Administration settings using saved credentials on any smart device, you will need to do a factory reset. This will issue a new Digital Passport over email, rendering any previous credentials or QR codes invalid
In order to do a Factory Reset, the DoorBird device needs to be hardwired to the internet, not on WiFi. Therefore if you DoorBird previously operated on WiFi, you will either need to get a temporary cable to that location, or as most people find easier, disconnect your DoorBird from the bracket or backbox and temporarily locate it at your router/modem so it can be patched in. Your smart device also needs to be on the WiFi of the same network.
Instruction Steps
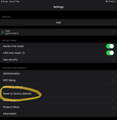
1. Select the Settings icon in the bottom right of the screen
2. Enter the ‘Reset to Factory Defaults’ in the section labelled ‘Further Functionality’
3. The Doorbird app will build a list of all Doorbird devices that are hardwired to the network (*Keep in mind your app doesn’t need to be paired to your DoorBird device for this to work, it just needs to be on the WiFi and the DoorBird hardwired.)
4. Choose the device from the list that you want to Factory Reset to start the wizard
5. Follow the wizard instructions of power cycling, confirming the reset, validating email address, and solving the Captcha on the email verification
6. At the end of the wizard you will receive a new Digital Passport that invalidates any previous version
7. Via the ‘Add Device’ wizard, you can pair the Doorbird to your app again
8. You will need to re-do any keycodes, fobs, or advanced settings that you had previously set up
We recommend printing and filing a paper copy of the new Digital Passport, as well as saving electronically on local storage as well as cloud storage. That way it is unlikely you will need to factory reset again in the future
Slow speed, late notifications
In some cases your DooBird might seem to be slow. This might look like:
- Getting late notifications
- Taking a long time to load video in the app
- Poor Audio quality in the call
- Poor Video quality in the call
First, its probably worth establishing what level of performance your DoorBird should be.
If you have upgraded from or use to own an older analog intercom system, there will be some differences. A modern internet-based video doorbell like a DoorBird, while having many more convenient features, will not be as fast or ‘instant’ as an older analog system. The older analog system is hardwired and instant, but it won’t call your smartphone, it won’t let you answer when you’re not at home, and it won’t let you view the video or history when you’re out and about. Although a DoorBird will do all those things, it won’t be instant like an analog system as it has to use the internet to send the video and audio.
In a typical and optimal system, your DoorBird should:
Receive a notification within 1-3 seconds of a visitor pressing the button
Be able to see video and answer the call within 3 - 8 seconds after tapping the notification
Open your door within 1 - 2 seconds of pressing the relay button (or 2 - 4 seconds if you are not at home)
If your DoorBird is slower than the numbers above, see the typical reasons and fixes below.
DoorBird Data Server
The original data server for DoorBird was in Germany, which due to the speed of Australia’s connection to Europe, has speeds considerably slower than above. In 2021 DoorBird opened a server in Australia which most commonly provides the speeds shown above as a reference. Any new DoorBird since mid-2021 should automatically connect to the Australian server, however any devices prior to that date have to be 'migrated' across.
How to check which server your DoorBird is connected to
1. Get your Digital Passport ready and go to www.doorbird.com/checkonline
2. Enter the MAC address and Token ID from your Digital Passport and solve the captcha
3. Look at the bottom of the table of results for the Data Server you are connected to.
If it says Asia/Australia/New Zealand, then it’s fine, you are connected to the local server.
If it says European server - Click the link below and we will have your DoorBird migrated to the Australian server
https://doorbirdintercom.com.au/pages/migration
Internet Speed
Being an internet device, the speed and quality of your home internet will have a large bearing on the performance of your DoorBird. Note that it's not looking for fast download speed like Netflix or browsing, it's actually looking for a fast upload speed. So check what upload speed your internet is supposed to provide, and do a speed test on your computer or smartphone to verify.
Another note on internet speed is how much other traffic is sharing your bandwidth. If you have a heap of other indoor and outdoor cameras, Google/Alexa devices, or home servers; you’ll actually be sharing that upload bandwidth with lots of other traffic. This should be factored in when calculating if you have enough upload speed to run the DoorBird at optimum performance.
Network / WiFi Settings
A typical home data network will usually be fine for a DoorBird intercom. The software is set up so that it simply needs internet access (faster the better). So there is no need to setup port forwarding or any complex QoS settings. However, if your network is corporate level and managed by a network professional, there may be security settings that could interfere with your DoorBird communicating with the server.
If your DoorBird is connected via WiFi, this is the single largest variable that can affect performance of the device. if your DoorBird is slow when connected to WiFi, disconnect it from the bracket and take it inside next to your router. If the lag is still present, there may be a problem with the DoorBird or internet service. However the performance is improved, the problem is likely your WiFi quality or quantity. Consider adding some WiFi boosters closer to your Doorbird, or some WiFi Access Points around the house.
Still not solved?
If your DoorBird is on the Australian server, you have 1.5mbps or more internet upload speed, and its hardwired or with solid WiFi and you still get slow speeds, please fill in the support form below and we will assist diagnosing further.
Connecting to WiFi
DoorBirds are typically installed as hardwired rather than WiFi. However, if you cannot run a cable, and you purchased a Surface mount DoorBird model, WiFi can be a lifesaver.
See here for our overview information on WiFi - https://doorbirdintercom.com.au/pages/wifi
If you are connecting your DoorBird via WiFi, please follow the guide below:
If you are experiencing problems connecting to WiFi following the below guide, see this troubleshooting guide from DoorBird: https://www.doorbird.com/downloads/misc/troubleshooting_wifi_en.pdf
PRO TIP - If you are installing a new DoorBird and connecting via WiFi, we recommend temporarily setting it up on a desk near your router first. If you connect the WiFi and pair it to your app before installing it at your door or gate, it will be much easier to diagnose any problems.
For eg if you configure it first and all goes well, then install it at your door and it doesn’t work, it’s far more likely that the WiFi signal is the problem, rather than something in the initial setup.
The 'adding via WiFi' process is slightly different for each DoorBird device, depending on its capability. As a result, DoorBird have created a simple to follow wizard for each device.
1. Install the Doorbird app on your smartphone.
2. Open the app and tap the ‘Settings’ cog icon

3. Select WiFi Setup
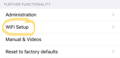
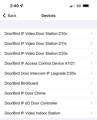
4. Choose the appropriate model from the DoorBird range
5. Select and follow the wizard.
If you still have problems connecting to WiFi, please see this page with WiFi troubleshooting.
https://www.doorbird.com/downloads/misc/troubleshooting_wifi_en.pdf
Hiding unused relays from the relay list
When you have more than 1 DoorBird device in a system, you may find when you press the ‘key’ button, you have a long list of relays that you might not be using. Sometimes we just want only the ones we have connected visible, to reduce the visual noise.
This is a common question we get when a client has 1 or more DoorBird Door stations, and/or 1 or more Indoor stations.
So the tricky thing about this one is that it's at ‘User’ level rather than ‘Device’ level. So it’s not a setting per device, its a setting per user. Which makes perfect sense really. You may set up an extra user so they have access to control the front gate, but not the garage door. Or the pedestrian gate, but not the driveway gate.
Therefore you can ‘show’ or ‘hide’ any and all relays, per user.
To Hide/Show DoorBird relays, follow the instructions below.
1. Go to the settings page
2. Select Administration
3. Select the applicable Door Station
4. Select 'User / Settings'

5. Select the user you want to hide unused relays for
*(******0000 is the admin so don’t select this one)
*(users start at ******0001)
*(you may only have 1 user configured)

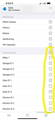
6. Select ‘Permissions’

7. Tick the relays you want to see, and untick the relays you want to hide.
(all relays associated with the door station and connected peripherals will show in the list)
8. Once finished, tap 'Back', and then 'Save'
9. You can repeat this for other users, and choose different relays to be viewable
10. You can repeat this for other Door Stations
Moving to a home with a DoorBird installed
If there’s one thing better than purchasing and installing your new DoorBird, it’s moving into a house that already has one!
However, it’s likely been set up in the previous owner's name and email address, and probably won’t work for you straight away. There may be a few things you have to do first.
Ultimately, at the end of this exercise, we want the DoorBird to have been factory reset. You will have a new Digital Passport ready to pair with your smartphone, and no previous users will have access to it any longer.
1: Network
First we have to check if it’s online and connected to the internet through your new internet service. The easiest way to check this, is by turning the DoorBird off then on again. At about 2 minutes after you turn it on, the DoorBird will announce through its speaker either “Successfully connected to internet”, or “No network found”.
If it announces ‘No Network’, then we have to fix that before we go any further.
If it announces “Successfully connected to the internet”, then we can skip forward to the Digital Passport.
Hard Wired
If the DoorBird is hard wired (preferred method), there will be a blue CAT6 cable likely somewhere near your internet point. This cable needs to be connected to your data switch or internet router, for internet access.
If you can see this cable and connect it to your router, try the power cycle again as above to see if you get the announcement “Successfully connected to internet”, and if so you can move on. If not, you may perhaps need a contractor to visit and get an understanding of the cabling, and get it connected to the internet.
WiFi
If the Doorbird only has a power cable and was previously set up on WiFi, then it definitely won’t work when you move in as your WiFi network will be different to the previous owners. In this case, you can open the app, go to settings, and run the WiFi wizard to get it connected to your WiFi. All as if it was a new DoorBird being connected to WiFi for the first time.
Once you get 'Successfully connected to Internet” from the speaker, you can move on to the next step.
2: Digital Passport
The Digital Passport is an A4 piece of paper that came with the DoorBird originally. This has information on your particular unit, and the QR codes needed to pair your smartphone with the app.
Do you have the Digital Passport?
Yes
If you have it, and you can pair the smartphone to the DoorBird, we recommend also adding the Administration account by scanning the Admin QR code. Once you have access to the admin settings you can change the email address associated with the DoorBird to your email address, save, and proceed to the Factory Reset.
No
If you don’t have the Digital Passport, then we can still proceed, it might just take a little longer. We have to have DoorBird remove the existing email address associated with the account, so that we can connect it to yours. They have a process for this, but for security purposes, the DoorBird needs to be powered off for 7 days after applying for the reset. This is to protect customers in case their DoorBird is stolen, and then someone tries to hijack the account.
If you can provide us with the MAC address of the DoorBird, we can apply to have it reset. You will then turn the power off for 7 days, and when we verify the email has been reset, you can turn it back on and proceed to the Factory Reset
3: Factory Reset
Factory resetting the DoorBird removes all access to previous users, and removes all keycodes / keyfobs / finger prints and settings. A new Digital Passport is issued via email, which voids the original or any subsequent Digital Passports.
The key point to a factory reset is that the device needs to be hard wired, not on WiFi. So if your device is connected via WiFi, you will need to remove it from the bracket or backbox, and temporarily connect it directly to your internet router. Once the factory reset is complete, it can be reinstalled in its location.
Once the DoorBird is hardwired to the internet, and announces “Successfully connected to internet” after being turned on, you are ready to run the wizard. Make sure your smartphone running the app is connected to the same network as the DoorBird.
Go to the ‘Settings’ page on the app → select ‘Reset to factory’. At this point the app will search the network for DoorBird devices and list them.
Select the applicable device, and follow the wizard within the app.
At the end you will have a new Digital Passport in PDF format, and can use the QR codes on that document to pair your smartphone to the app.
A few more notes regarding DoorBird Tech Support:
- please don't send any DoorBird devices back until an RMA has been authorised. Typically the fastest path to resolution is to diagnose the problem in its installed location.
- RMA is decided and controlled by DoorBird head office in Germany
- RMA seldom includes the fascia, backbox, and accessories: most often just the electronics box behind the fascia is included
- Doorbird warranty terms do not cover costs involved with installation, de-installation and re-installation
For phone support, please call tel:0721399300
Keep in mind, we will still need all the information from the above form.